Fork me on GitHub
Suzf  Blog

Archive Linux

Zabbix之监控Mysql性能

Zabbix还可以监控mysql slow queries,mysql version,uptime,alive等。下面通过Zabbix Graphs实时查看的SQL语句操作情况和mysql发送接收的字节数。
1.Zabbix官方提供的监控mysql的模板Template App MySQL,可以看到相关的Items和key。
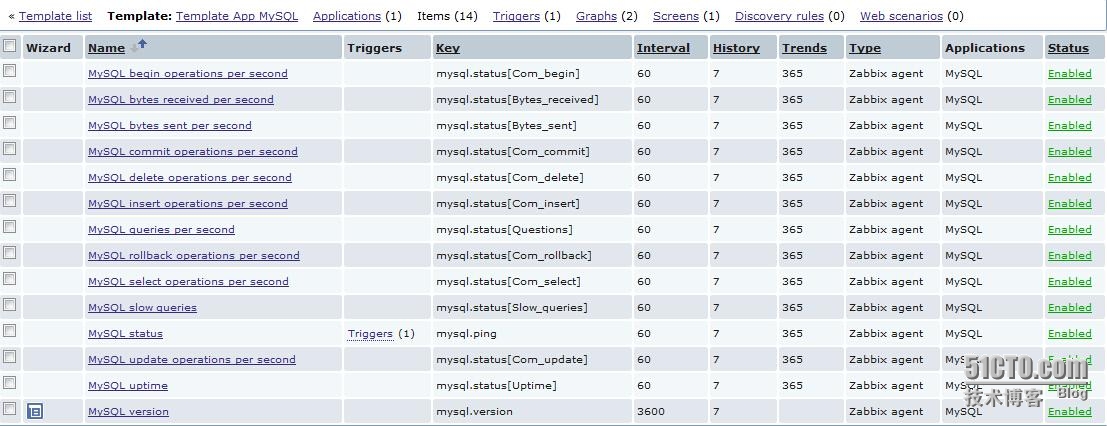
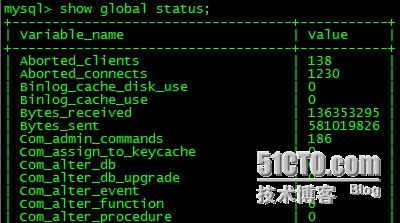
2. 把该模板Template App MySQL Link到相关的主机上面,发现Item的Status是不可用的,因为key的值是通过Mysql用户查看"show global status"信息或者用mysqladmin命令查看status或extended-status的信息而取的值。

mysql> show global status;

3.创建只读 账户zabbix

mysql> insert into mysql.user(Host,User,Password)values("localhost","zabbix",password("yourpasswd"));
mysql> update mysql.user set Select_priv="Y" where user="zabbix" and HOST="localhost";
mysql>flush privileges;
# mysqladmin -uzabbix -p status
Uptime: 3023456 Threads: 16 Questions: 941201 Slow queries: 0 Opens: 491 Flush tables: 1 Open tables: 90 Queries per second avg: 0.311

4.结合官方提供的key编写Shell脚本,从数据库中取出Items的key的值。

# cat /usr/local/zabbix/scripts/checkmysqlperformance.sh

#!/bin/sh

#Modified by Jeffery Aug,18 2014
MYSQL_SOCK="/var/lib/mysql/mysql.sock"
#MYSQL_PWD=`cat /var/lib/mysql/3306/.mysqlpassword`
MYSQL_PWD=yourpasswd

ARGS=1

if [ $# -ne "$ARGS" ];then
echo "Please input one arguement:"
fi

case $1 in
Uptime)
result=`mysqladmin -uzabbix -p${MYSQL_PWD} -S $MYSQL_SOCK status|cut -f2 -d":"|cut -f1 -d"T"`
echo $result
;;

Com_update)
result=`mysqladmin -uzabbix -p${MYSQL_PWD} -S $MYSQL_SOCK extended-status |grep -w "Com_update"|cut -d"|" -f3`
echo $result
;;

Slow_queries)
result=`mysqladmin -uzabbix -p${MYSQL_PWD} -S $MYSQL_SOCK status |cut -f5 -d":"|cut -f1 -d"O"`
echo $result
;;

Com_select)
result=`mysqladmin -uzabbix -p${MYSQL_PWD} -S $MYSQL_SOCK extended-status |grep -w "Com_select"|cut -d"|" -f3`
echo $result
;;

Com_rollback)
result=`mysqladmin -uzabbix -p${MYSQL_PWD} -S $MYSQL_SOCK extended-status |grep -w "Com_rollback"|cut -d"|" -f3`
echo $result
;;

Questions)
result=`mysqladmin -uzabbix -p${MYSQL_PWD} -S $MYSQL_SOCK status|cut -f4 -d":"|cut -f1 -d"S"`
echo $result
;;

Com_insert)
result=`mysqladmin -uzabbix -p${MYSQL_PWD} -S $MYSQL_SOCK extended-status |grep -w "Com_insert"|cut -d"|" -f3`
echo $result
;;

Com_delete)
result=`mysqladmin -uzabbix -p${MYSQL_PWD} -S $MYSQL_SOCK extended-status |grep -w "Com_delete"|cut -d"|" -f3`
echo $result
;;

Com_commit)
result=`mysqladmin -uzabbix -p${MYSQL_PWD} -S $MYSQL_SOCK extended-status |grep -w "Com_commit"|cut -d"|" -f3`
echo $result
;;

Bytes_sent)
result=`mysqladmin -uzabbix -p${MYSQL_PWD} -S $MYSQL_SOCK extended-status |grep -w "Bytes_sent" |cut -d"|" -f3`
echo $result
;;

Bytes_received)
result=`mysqladmin -uzabbix -p${MYSQL_PWD} -S $MYSQL_SOCK extended-status |grep -w "Bytes_received" |cut -d"|" -f3`
echo $result
;;

Com_begin)
result=`mysqladmin -uzabbix -p${MYSQL_PWD} -S $MYSQL_SOCK extended-status |grep -w "Com_begin"|cut -d"|" -f3`
echo $result
;;

*)
echo "Usage:$0(Uptime|Com_update|Slow_queries|Com_select|Com_rollback|Questions)"
;;

esac

4.在Zabbix_agentd.conf里面添加UserParameter,格式如下,对于Zabbix来说,脚本其实就是一个插件。

# cat /usr/local/zabbix/etc/zabbix_agentd.conf| grep -v "^$\|^#"

LogFile=/tmp/zabbix_agentd.log

Server=172.16.9.38

ServerActive=172.16.9.38:10051

Hostname=172.16.9.26

UnsafeUserParameters=1

UserParameter=mysql.version,mysql -V

UserParameter=mysql.ping,mysqladmin -uzabbix -p\7h@6npqQlaX -S /var/lib/mysql/mysql.sock ping | grep -c alive

UserParameter=mysql.status[*],/usr/local/zabbix/scripts/checkmysqlperformance.sh $1

5.重启agentd服务器

/etc/init.d/zabbix_agentd restart

6.然后在zabbix server用zabbix_get就可以取到key的值。

# /usr/local/zabbix/bin/zabbix_get -s 172.16.9.26 -p10050 -k mysql.status[Uptime]
3386849

# /usr/local/zabbix/bin/zabbix_get -s 172.16.9.26 -p10050 -k mysql.status[Com_select]
275188

6.在zabbix前端可以实时查看SQL语句每秒钟的操作次数。

7.在zabbix前端可以实时查看mysql发送接收的字节数。其中bytes received表示从所有客户端接收到的字节数,bytes sent表示发送给所有客户端的字节数。

总结:
1)把该脚本放到要监控的服务器上面(Modify mysql user and password),修改UserParameter的参数并重启agentd,Link官方提供的Template App MySQL模板即可。
2)我这里是测试环境用的是新创建的只读账户zabbix,线上服务器安全期间可以给mysql用户授权readonly权限。

3)根据实际的需求,除了监控上述监控项之外,还可以监控mysql processlist,Innodb等。


Zabbix 之自动发现规则

1、 打开configure--Discovery--create discovery rule:

需要添加名称,ip地址段(这个地址段以覆盖你所有IP的最小地址段为好),checks。其中checks最为重要,总共三项,只填写key,这里用 system.uname这个key。然后点击添加并保存。这里的意思是zabbix服务器端扫描这个网段中的zabbix客户端(客户端端口默认为 10050),扫描到之后取客户端的system.uname值,这个值返回的类似于linux系统中的uname –a命令,值为下面形式:

[root@localhost ~]# /usr/local/zabbix/bin/zabbix_get -s192.168.8.29 -ksystem.uname
Linux *.*.com 2.6.32-431.el6.x86_64 #1 SMP Fri Nov 22 03:15:09 UTC 2013 x86_64

这个主要用于发现主机之后把主机自动分配到相应的组(比如linux组或是windowns组)中,并且应用相应的监控模板。

当然,这个key值不一定要用system.uname,也可以用其他的key,首先zabbix客户端支持这个key,在这用这个key可以区分不同类型的主机方便分组应用监控模板。

2.打开zabbix的系统配置---action--Event source —create action:

发现规则

关联模板

这 几项的意思是当自动发现通过发现zabbix客户端,并且接收到key的中包含linux字符,即把他添加到linux_servers组中,应用 linux_server模板。等一段时间即可查看自动发现的结果。结果可以在zabbix首页中最下面有状态,也可以在zabbix的状态统计---自 动发现中查看,可以看到发现了多少,监控了多少。

然后查看hostname 是否和agentd.conf中相一致

到此为止,zabbix的监控设置说明完毕。

在Monitoring中的Discovery中会出现发现的主机


Zabbix 之自定义Key

1、监控进程
/usr/local/zabbix/bin/zabbix_get -s 127.0.0.1 -k “net.tcp.service[http]”

2、监控端口
/usr/local/zabbix/bin/zabbix_get -s 127.0.0.1 -k “net.tcp.port[,80]” 结果:1存在,0不存在;

3、进程数量
/usr/local/zabbix/bin/zabbix_get -s 127.0.0.1 -k “proc.num[]”
/usr/local/zabbix/bin/zabbix_get -s 127.0.0.1 -k “proc.num[httpd]”

4、其他
vm.memory.size[available]
vfs.file.cksum[/etc/passwd]
system.cpu.switches
system.cpu.num
system.cpu.util[,user]
system.cpu.util[,nice]
system.cpu.util[,system]
system.cpu.util[,iowait]
system.cpu.util[,idle]
system.cpu.util[,interrupt]
system.cpu.util[,steal]
system.cpu.util[,softirq]
system.swap.size[,free]
system.swap.size[,pfree]
system.boottime
system.localtime
system.hostname
system.cpu.intr
kernel.maxfiles
kernel.maxproc
system.users.num
proc.num[]
proc.num[,,run]
system.cpu.load[percpu,avg1]
system.cpu.load[percpu,avg5]
system.cpu.load[percpu,avg15]
system.uname
system.uptime
vm.memory.size[total]
system.swap.size[,total]
net.tcp.service[ftp,,155]
net.tcp.service[http]
net.tcp.service.perf[http,,8080]
net.tcp.service[service,, ]


How-to: Disabling Hyper-threading on a Dell PE R730

Q:I need to disable hyper-threading due to licensing issues but, I can't find the setting in the BIOS that would allow me to disable it. Does anyone know where I can find the setting on a Dell PowerEdge R730?

A: The BIOS option is called “Logical Processors”. See the manual ftp://ftp.dell.com/Manuals/Common/poweredge-r720_Owner's%20Manual_en-us.pdf

And you can run `lscpu` to check the current BIOS configure

逻辑处理器;

启用或禁用逻辑处理器和显示逻辑处理器的数量。如果 Logical Processor
( 逻辑处理器) 选项设置为 Enabled( 已启用), BIOS 将显示所有逻辑处
理器。如果此选项设置为 Disabled( 已禁用), 则 BIOS 对每个核心仅显示
一个逻辑处理器。默认情况下, Logical Processor( 逻辑处理器) 选项设置
为 Enabled( 已启用) 。

dell.community : http://en.community.dell.com/support-forums/servers/f/956/t/19453790

Zbbix之邮件报警

本次内容就介绍一下如何的在zabbix里进行邮件报警,并且自定义邮件报警的格式。

1.选择“Administration-Media types“

选择“Email“

输入相应信息

然后保存

2.选择“Administration-Users“

选择“users“,然后在选择”admin“用户

在选择“Media”,选择“Add”

输入相应的信息,其中第一行类型是刚才配置的“示警媒体类型”。

然后选择保存

3.选择“Configuration-Actions-create action”

具体配置如下

动作界面内容为

条件界面内容为

操作界面内容为

然后保存

4.在zabbix的服务端,一定要有mta端,也就是sendmail或者postfix,然后启动他们。

通过以上的设置,就可以实现zabbix邮件报警了,下面介绍如何的自定义报警内容信息。

5.测试

模拟故障触发trigger,查看报警功能是否正确配置

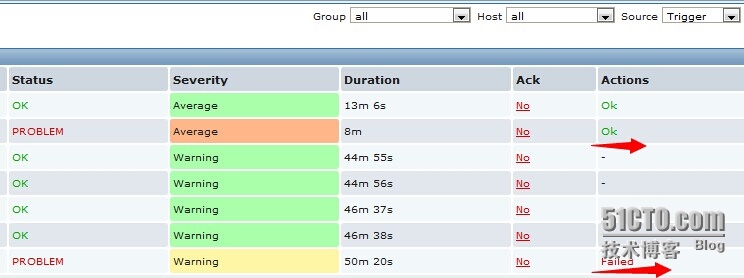
选择“Monitoring-Events-Trigger”

如果看到OK那么报配置完成,如果是failed 请重新检测以上配置。

如果想定义其他的格式,可以参考https://www.zabbix.com/documentation/1.8/manual/config/macros


How-to fix SNMPD daemon fails to start

SNMPD daemon fails to start

Symptoms

The 'service snmpd start' command does not return any error, but 'ps auxw | grep snmpd' command shows that the SNMPD daemon is not running.

/var/log/snmpd.log shows:
getaddrinfo("IP_Address", NULL, ...): Address family for hostname not supported
Error opening specified endpoint "IP_Address:161"
Server Exiting with code 1

We should check that nothing in /etc/default/snmpd or /etc/sysconfig/snmpd.options is over-riding your configuration.
I think by default, the local loopback address (127.0.0.1) is passed in the SNMPDOPTS directive.
if yes, Remove the unknown IP_Address:161 from the SNMPDOPTS

now start the snmpd again.


Linux change the speed and duplex settings of an Ethernet card

Q. How do I change the speed, duplex on for my Ethernet card?

A. Under Linux use mii-tool or ethtool package which allows a Linux sys admin to modify/change and view the negotiated speed of network interface card (NIC) i.e. it is useful for forcing specific Ethernet speed and duplex settings.

Depending on which type of Ethernet card is installed on the system you need to use either mii-tool or ethtool. I recommend installing both and use one of the tool, which will work with your card.

Task: Install mii-tool and ethtool tools

If you are using Debian Linux you can install both of these package with following command:# apt-get install ethtool net-toolsIf you are using Red Hat Enterprise Linux you can install both of these package with following command:# up2date ethtool net-toolsIf you are using Fedora Core Linux you can install both of these package with following command:# yum install ethtool net-tools

Task: Get speed and other information for eth0

Type following command as root user:
# ethtool eth0Output:

Settings for eth0:
     Supported ports: [ TP MII ]
     Supported link modes:   10baseT/Half 10baseT/Full
                             100baseT/Half 100baseT/Full
     Supports auto-negotiation: Yes
     Advertised link modes:  10baseT/Half 10baseT/Full
                             100baseT/Half 100baseT/Full
     Advertised auto-negotiation: Yes
     Speed: 100Mb/s
     Duplex: Full
     Port: MII
     PHYAD: 32
     Transceiver: internal
     Auto-negotiation: on
     Supports Wake-on: pumbg
     Wake-on: d
     Current message level: 0x00000007 (7)
     Link detected: yes

Or use mii-tool command as follows:# mii-tool eth0Output:

eth0: negotiated 100baseTx-FD flow-control, link ok

Task: Change the speed and duplex settings

Setup eth0 negotiated speed with mii-tool
Disable autonegotiation, and force the MII to either 100baseTx-FD, 100baseTx-HD, 10baseT-FD, or 10baseT-HD:# mii-tool -F 100baseTx-HD
# mii-tool -F 10baseT-HD
Setup eth0 negotiated speed with ethtool# ethtool -s eth0 speed 100 duplex full
# ethtool -s eth0 speed 10 duplex half
To make these settings permanent you need to create a shell script and call from /etc/rc.local (Red Hat) or if you are using Debian create a script into the directory /etc/init.d/ directory and run update-rc.d command to update the script.

Read man page of mii-tool and ethtool for more information.

Author: nixCraft

Link: Linux change the speed and duplex settings of an Ethernet card


How-to debug rsyslog

有时您可能会想,是否您创建的配置真的被使用。至少它的一部分没有生效,这真的可以在很多情况下发生。目前,配置格式发生了很大改变。这迫使想要使用新格式的用户使用旧的和新的配置风格的混合模式。这是可以发生很多混乱的地方,这导致不能正确设置配置变量。实际上,您只需要在配置中创建一些一致的。大多数输出​​模块已经更新。如果要使用新格式,则不能同时使用一些旧的配置指令和一些新的配置指令。旧的将被忽略。相反,将使用默认值。一个很常见的情况是队列,这是我将用于展示的例子

# grep "Debug Rsyslog" -A 2 /etc/rsyslog.conf
# Debug Rsyslog
$DebugFile /var/log/rsyslog-debug.log
$DebugLevel 2

之后重启 Rsyslog

# head /var/log/rsyslog-debug.log 

7201.157636478:7fda87eb9780: debug level 2 set via config file
7201.157787141:7fda87eb9780: This is rsyslog version 7.4.7
7201.157882255:7fda87eb9780: cnf:global:cfsysline: $ModLoad imuxsock # provides support for local system logging (e.g. via logger command)
7201.157990846:7fda87eb9780: Requested to load module 'imuxsock'
7201.158081765:7fda87eb9780: loading module '/usr/lib64/rsyslog/imuxsock.so'
7201.229115267:7fda87eb9780: imuxsock version 7.4.7 initializing
7201.229297485:7fda87eb9780: rsyslog/glbl: using '127.0.0.1' as localhost IP
7201.229537950:7fda87eb9780: module imuxsock of type 0 being loaded (keepType=0).
7201.229673687:7fda87eb9780: module config name is 'imuxsock'

Reference

[0] http://www.rsyslog.com/how-to-use-debug-on-demand/

[1] http://www.rsyslog.com/how-to-create-debug-information-with-strace/

[2] http://www.rsyslog.com/how-to-check-if-config-variables-are-used/