前言
日志中心化给我们带来了好多优势, 那么我们如何收集 Nginx 日志到日志服务器呢? Nginx 自 1.7.1 版本之后开始支持 syslog.


日志中心化给我们带来了好多优势, 那么我们如何收集 Nginx 日志到日志服务器呢? Nginx 自 1.7.1 版本之后开始支持 syslog.
Django 的部署可以有很多方式,采用 nginx + uwsgi 的方式是其中比较常见的一种方式。
安装所需软件
pip install Django
apt-get install nginx

pip install uwsgi
# 注: 在 Debian/Ubuntu 系统中需要安装 python-dev
创建一个 test.py 的文件
# test.py
def application(env, start_response):
    start_response('200 OK', [('Content-Type','text/html')])
    return [b"Hello World"] # python3
    #return ["Hello World"] # python2
运行 uWSGI
uwsgi --http :8000 --wsgi-file test.py
参数含义: http :8000: 使用http协议 8000端口 wsgi-file test.py: 加载指定文件 test.py 执行 Curl 命令在终端上返回 Hello world
$curl http://172.16.9.110:8000
Hello World
如果返回的是正确的内容,说明下面工作流程的组件是工作的:
the web client <-> uWSGI <-> Python
测试你的 Django 项目 确保你的项目是可以顺利运行的
python manage.py runserver 0.0.0.0:8000
如果没有报错,使用 uWSGI 的方式运行它
uwsgi --http :8000 --wsgi-file mysite.wsgi
通过浏览器访问正常, 说明下面工作流程的组件是工作的:
the web client <-> uWSGI <-> Django
# mysite_nginx.conf

# the upstream component nginx needs to connect to
upstream django {
    server unix:///path/to/your/mysite/mysite.sock; # for a file socket
    # server 127.0.0.1:8001; # for a web port socket (we'll use this first)
}

# configuration of the server
server {
    # the port your site will be served on
    listen      8000;
    # the domain name it will serve for
    server_name .example.com; # substitute your machine's IP address or FQDN
    charset     utf-8;

    # max upload size
    client_max_body_size 75M;   # adjust to taste

    # Django media
    location /media  {
        alias /path/to/your/mysite/media;  # your Django project's media files - amend as required
    }

    location /static {
        alias /path/to/your/mysite/static; # your Django project's static files - amend as required
    }

    # Finally, send all non-media requests to the Django server.
    location / {
        uwsgi_pass  django;
        include     /path/to/your/mysite/uwsgi_params; # the uwsgi_params file you installed
    }
}
如果上面一切都显示正常,则下面命令可以拉起django application
uwsgi --socket mysite.sock --wsgi-file mysite.wsgi --chmod-socket=664
每次都运行上面命令拉起django application实在麻烦,使用.ini文件能简化工作,方法如下: 在application目录下创建文件mysite_uwsgi.ini,填入并修改下面内容:
# mysite_uwsgi.ini file
[uwsgi]

# Django-related settings
# the base directory (full path)
chdir           = /path/to/your/project
# Django's wsgi file
module          = project.wsgi
# the virtualenv (full path)
home            = /path/to/virtualenv

# process-related settings
# master
master          = true
# maximum number of worker processes
processes       = 10
# the socket (use the full path to be safe
socket          = /path/to/your/project/mysite.sock
# ... with appropriate permissions - may be needed
# chmod-socket    = 664
# clear environment on exit
vacuum          = true
之后使用这个文件运行 uwsgi
uwsgi --ini mysite_uwsgi.ini # the --ini option is used to specify a file
Once again, test that the Django site works as expected.
参考链接
[0] http://uwsgi-docs.readthedocs.io/en/latest/tutorials/Django_and_nginx.html
[1] http://www.jianshu.com/p/e6ff4a28ab5a
Nginx 作为目前最流行的开源反向代理HTTP Server,用于实现资源缓存、web server负载均衡等功能,由于其轻量级、高性能、高可靠等特点在互联网项目中有着非常普遍的应用,相关概念网上有丰富的介绍。分布式web server集群部署后需要实现session共享,针对 tomcat 服务器的实现方案多种多样,比如 tomcat cluster session 广播、nginx IP hash策略、nginx sticky module等方案,本文主要介绍了使用 redis 服务器进行 session 统一存储管理的共享方案。
使 用Nginx作为Tomcat的负载平衡器,Tomcat的会话Session数据存储在Redis,能够实现0当机的7×24运营效果。因为将会话存储 在Redis中,因此Nginx就不必配置成stick粘粘某个Tomcat方式,这样才能真正实现后台多个Tomcat负载平衡,用户请求能够发往任何 一个tomcat主机,当我们需要部署新应用代码时,只要停止任何一台tomcat,所有当前在线用户都会导向到运行中的tomcat实例,因为会话数据 被序列化到Redis,在线用户不会受到影响,一旦停掉的tomcat实例上线,另外其他重复部署过程。
负载均衡技术是构建大型网站必不可少的架构策略之一。它的目的是,把用户的请求分发到多台后端的设备上,用以均衡服务器的负载。我们可以把负载均衡器划分为两大类:硬件负载均衡器和软件负载均衡器。
硬件负载均衡器,常见的有NetScaler、F5、Radware和Array等,这些设备为专业的厂商开发的负载均衡器,价格比较高昂,但也提供了高 可用性和高稳定性,同时还提供专业的技术服务,这些设备往往都是一些大企业(非IT类)所热衷的。因为这些企业不缺乏资金,也没有专业的it团队来开发和 运维类似的负载均衡套件。
软件负载均衡器,较流行的有LVS,haproxy,nginx。这三种软件负载均衡器都为开源软件,任何个人或企业都可以无偿使用,所以对于一些小企业 或者比较专业的大型IT或者互联网企业来说,使用这些软件负载均衡器成为了一种必然趋势。下面简单分析一些这三种开源负载均衡器的特点:
LVS特点是:
1. 首先它是基于4层的网络协议的,抗负载能力强,对于服务器的硬件要求除了网卡外,其他没有太多要求;
2. 配置性比较低,这是一个缺点也是一个优点,因为没有可太多配置的东西,大大减少了人为出错的几率;
3. 应用范围比较广,不仅仅对web服务做负载均衡,还可以对其他应用(mysql)做负载均衡;
4. LVS架构中存在一个虚拟IP的概念,需要向IDC多申请一个IP来做虚拟IP。
Nginx负载均衡器的特点是:
1. 工作在网络的7层之上,可以针对http应用做一些分流的策略,比如针对域名、目录结构;
2. Nginx安装和配置比较简单,测试起来比较方便;
3. 也可以承担高的负载压力且稳定,一般能支撑超过上万次的并发;
4. Nginx可以通过端口检测到服务器内部的故障,比如根据服务器处理网页返回的状态码、超时等等,并且会把返回错误的请求重新提交到另一个节点,不过其中缺点就是不支持url来检测;
5. Nginx对请求的异步处理可以帮助节点服务器减轻负载;
6. Nginx能支持http和Email,这样就在适用范围上面小很多;
7. 默认有三种调度算法: 轮询、weight以及ip_hash(可以解决会话保持的问题),还可以支持第三方的fair和url_hash等调度算法;
HAProxy的特点是:
1. HAProxy是工作在网络7层之上;
2. 支持Session的保持,Cookie的引导等;
3. 支持url检测后端的服务器出问题的检测会有很好的帮助;
4. 支持的负载均衡算法:动态加权轮循(Dynamic Round Robin),加权源地址哈希(Weighted Source Hash),加权URL哈希和加权参数哈希(Weighted Parameter Hash);
5. 单纯从效率上来讲HAProxy更会比Nginx有更出色的负载均衡速度;
6. HAProxy可以对Mysql进行负载均衡,对后端的DB节点进行检测和负载均衡。
搞puppet也有三几天了,一些概念还不是很清晰。很多时候实验未成功,都是概念没有理清楚、文档没有看全。别的就先不说了,先来安装一个nginx 来试一下吧。
nginx需要支持 http_stub_status_module 编译的时候需要使用--with-http_stub_status_module
yum默认支持此选项
1. 配置nginx stuats
源码: vim nginx.conf
yum: vim /etc/nginx/conf.d/default.conf
#and add the following to your server block
location /nginx_status {
stub_status on;
access_log off;
allow 127.0.0.1;
allow 172.16.7.70; #Put your servers IPaddress instead of 172.16.7.70
deny all;
}
#这里是线上Nginx的配置【yum】
location /nginx_status {
stub_status on;
allow 127.0.0.1;
allow 172.16.99.38;
}
# 检测配置文件
nginx -t
# 重新加载配置文件
nginx -s reload
2.查看Nginx状态信息
curl localhost/nginx_status
注解:
Active connections: 1 当前活动的连接数
server accepts handled requests
3721 3721 3714
3721 从启动到现在一共处理的连接数
3721 从启动到现在成功创建的握手的次数
3714 总共处理的请求数(requests)
请求的丢失数=(握手-连接)
connection 连接数,tcp连接
request http请求,GET/POST/DELETE
Reading: 0 Writing: 1 Waiting: 0
Reading: 0 读取客户端Header的信息数 请求头
Writing: 1 返回给客户端的header的信息数 响应头
Waiting: 0 等待的请求数
3. zabbix客户端配置
#创建检测脚本
mkdir /usr/local/zabbix/scripts
vi /usr/local/zabbix/scripts/nginx_status.sh

#!/bin/bash
# Script to fetch nginx statuses for tribily monitoring systems
# Author: [email protected]
# License: GPLv2

# Set Variables
#BKUP_DATE=`/bin/date +%Y%m%d`
#LOG="/etc/zabbix/nginx_status.log"
HOST=`/sbin/ifconfig eth0 | sed -n '/inet /{s/.*addr://;s/ .*//;p}'`
PORT="80"

# Functions to return nginx stats

function active {
/usr/bin/curl "http://$HOST:$PORT/nginx_status" 2>/dev/null| grep 'Active' | awk '{print $NF}'
}

function reading {
/usr/bin/curl "http://$HOST:$PORT/nginx_status" 2>/dev/null| grep 'Reading' | awk '{print $2}'
}

function writing {
/usr/bin/curl "http://$HOST:$PORT/nginx_status" 2>/dev/null| grep 'Writing' | awk '{print $4}'
}

function waiting {
/usr/bin/curl "http://$HOST:$PORT/nginx_status" 2>/dev/null| grep 'Waiting' | awk '{print $6}'
}

function accepts {
/usr/bin/curl "http://$HOST:$PORT/nginx_status" 2>/dev/null| awk NR==3 | awk '{print $1}'
}

function handled {
/usr/bin/curl "http://$HOST:$PORT/nginx_status" 2>/dev/null| awk NR==3 | awk '{print $2}'
}

function requests {
/usr/bin/curl "http://$HOST:$PORT/nginx_status" 2>/dev/null| awk NR==3 | awk '{print $3}'
}

# Run the requested function
$1
# 对脚本赋予执行权限
chmod +x /usr/local/zabbix/scripts/nginx_status.sh
# 修改agent 配置文件
vim /usr/local/zabbix/etc/zabbix_agentd.conf
#开启自定义KEY功能
UnsafeUserParameters=1
UserParameter=nginx.accepts,/usr/local/zabbix/scripts/nginx_status.sh accepts
UserParameter=nginx.handled,/usr/local/zabbix/scripts/nginx_status.sh handled
UserParameter=nginx.requests,/usr/local/zabbix/scripts/nginx_status.sh requests
UserParameter=nginx.connections.active,/usr/local/zabbix/scripts/nginx_status.sh active
UserParameter=nginx.connections.reading,/usr/local/zabbix/scripts/nginx_status.sh reading
UserParameter=nginx.connections.writing,/usr/local/zabbix/scripts/nginx_status.sh writing
UserParameter=nginx.connections.waiting,/usr/local/zabbix/scripts/nginx_status.sh waiting
#重启zabbix_agentd
/etc/init.d/zabbix_agentd restart
4.服务端测试
# 有信息返回说明配置正常
# /usr/local/zabbix/bin/zabbix_get -s 172.16.99.25 -knginx.accepts
12877
# 有图有真相

#模板
http://pan.baidu.com/s/1c00Aqcg
FAQ : 若果是无返回信息则说明agent端配置错误这是查看zabbix_agentd.log 的输出日志,排查错误
#查看who权限
# ll /sbin/ifconfig
-rwx------ 1 root root 73936 May 10 2012 /sbin/ifconfig
# ll /usr/bin/who
-rwx------ 1 root root 48952 Nov 22 2013 /usr/bin/who
果真没有执行权限
visudo 授权或是 chmod +x /usr/bin/who && chmod +x /sbin/ifconfig
1、轮询(默认)
每个请求按时间顺序逐一分配到不同的后端服务器,如果后端服务器down掉,能自动剔除。
2、weight
指定轮询几率,weight和访问比率成正比,用于后端服务器性能不均的情况。
例如:
upstream bakend {
server 172.16.7.14 weight=10;
server 172.16.7.15 weight=10;
}
3、ip_hash
每个请求按访问ip的hash结果分配,这样每个访客固定访问一个后端服务器,可以解决session的问题。
例如:
upstream bakend {
ip_hash;
server 172.16.7.14:88;
server 172.16.7.15:80;
}
4、fair(第三方)
按后端服务器的响应时间来分配请求,响应时间短的优先分配。
upstream backend {
server server1;
server server2;
fair;
}
5、url_hash(第三方)
按访问url的hash结果来分配请求,使每个url定向到同一个后端服务器,后端服务器为缓存时比较有效。
例:在upstream中加入hash语句,server语句中不能写入weight等其他的参数,hash_method是使用的hash算法
upstream backend {
server squid1:3128;
server squid2:3128;
hash $request_uri;
hash_method crc32;
}
upstream bakend{#定义负载均衡设备的Ip及设备状态
ip_hash;
server 127.0.0.1:9090 down;
server 127.0.0.1:8080 weight=2;
server 127.0.0.1:6060;
server 127.0.0.1:7070 backup;
}
在需要使用负载均衡的server中增加
proxy_pass http://bakend/;
每个设备的状态设置为:
1.down 表示单前的server暂时不参与负载
2.weight 默认为1.weight越大,负载的权重就越大。
3.max_fails :允许请求失败的次数默认为1.当超过最大次数时,返回proxy_next_upstream 模块定义的错误
4.fail_timeout:max_fails次失败后,暂停的时间。
5.backup: 其它所有的非backup机器down或者忙的时候,请求backup机器。所以这台机器压力会最轻。
nginx支持同时设置多组的负载均衡,用来给不用的server来使用。
client_body_in_file_only 设置为On 可以讲client post过来的数据记录到文件中用来做debug
client_body_temp_path 设置记录文件的目录 可以设置最多3层目录
location 对URL进行匹配.可以进行重定向或者进行新的代理 负载均衡
例:配置使用Nginx实现LB
[root@Jeffery ~]# sed -i '/^[ \t]*#/d; /^$/d' /usr/local/nginx/conf/nginx.conf
[root@Jeffery ~]# cat /usr/local/nginx/conf/nginx.conf
worker_processes 1;
events {
worker_connections 1024;
}
http {
upstream Jeffery_lb {
ip_hash; #会话保持
server 172.16.7.30:80; #后端的真实服务器
server 172.16.7.40:80; #后端的真实服务器
server 172.16.7.50:80; #后端的真实服务器
}
server {
listen 80;
server_name www.Jeffery.com;
location / {
root html;
index index.php index.html index.htm;
proxy_pass http://Jeffery_lb;
proxy_set_header Host $host;
}
error_page 500 502 503 504 /50x.html;
location = /50x.html {
root html;
}
}
}
Nginx访问控制
========================================================
基于用户
基于主机
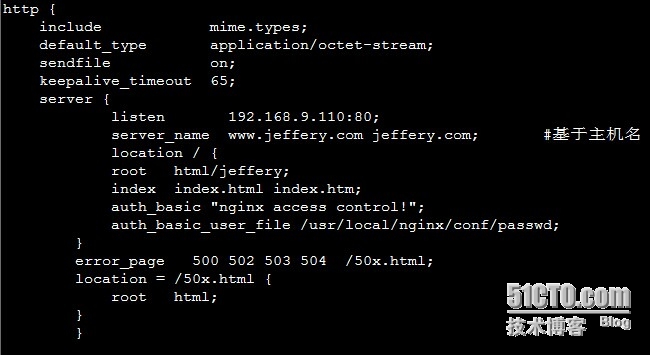
一、基于用户的访问控制
1. 检测是否有htpasswd命令

建立口令文件

查看口令文件

2. 实现认证[用户]
[root@Jeffery ~]# vim /usr/local/nginx/conf/nginx.conf

3. 访问测试
检测配置文件,重新加载

访问测试
[root@Jeffery ~]# links www.jeffery.com

二、基于主机的访问控制
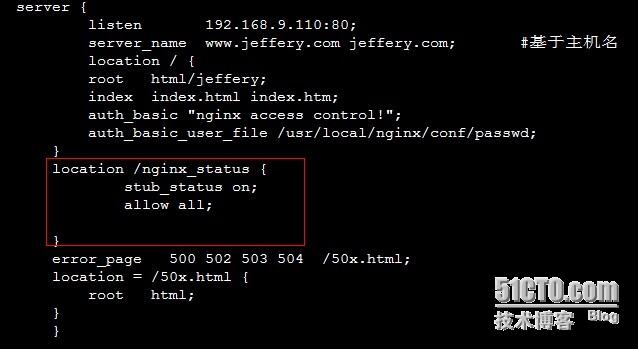
修改配置文件

重载与测试

========================================================
Nginx状态查看
一、编译安装Nginx时
--with-http_stub_status_module
查看当前编译参数
[root@Jeffery ~]# /usr/local/nginx/sbin/nginx -V
nginx version: nginx/1.2.2
built by gcc 4.4.7 20120313 (Red Hat 4.4.7-4) (GCC)
TLS SNI support enabled
configure arguments: --user=www --group=www --prefix=/usr/local/nginx-1.2.2 --with-http_stub_status_module --with-http_sub_module --with-http_ssl_module --with-pcre=/usr/local/src/pcre-8.31
二、配置Nginx
# vim /usr/local/nginx/conf/nginx.conf

重启服务
[root@Jeffery ~]# /usr/local/nginx/sbin/nginx -t
nginx: the configuration file /usr/local/nginx-1.2.2/conf/nginx.conf syntax is ok
nginx: configuration file /usr/local/nginx-1.2.2/conf/nginx.conf test is successful
[root@Jeffery ~]# /usr/local/nginx/sbin/nginx -s reload
查看Nginx状态信息

Active connections: 1 当前活动的连接数
server accepts handled requests
18 18 45
18 从启动到现在一共处理的连接数
18 从启动到现在成功创建的握手的次数
45 总共处理的请求数(requests)
请求的丢失数=(握手-连接)
connection 连接数,tcp连接
request http请求,GET/POST/DELETE
Reading:0 Writing: 1 Waiting: 0
Reading: 0 读取客户端Header的信息数 请求头
Writing: 1 返回给客户端的header的信息数 响应头
Waiting: 0 等待的请求数
Nginx 虚拟主机
========================================================
虚拟主机是在网络服务器上划分出一定的磁盘空间供用户放置站点、应用组件等,提供必要的站点功能、数据存放和传输功能。所谓虚拟主机,也叫“网站空间”,就是把一台运行在互联网上的服务器划分成多个“虚拟”的服务器,每一个虚拟主机都具有独立的域名和完整的Internet服务器(支持WWW、FTP、E-mail等)功能,从用户角度来看,每台虚拟术机和一台独立的服务器完全相同,在IP地址日益紧张的今天,基于域名的虚拟主机要比基于IP的虚拟主机使用的更加广泛。
========================================================
三种表现形式:
基于主机
基于端口
基于IP
准备工作:
安装好nginx,这里不做介绍,如果需要请在本博中查找。
一、规划
网站 IP 网站主目录
www.jeffery.com 192.168.9.110 /nginx/jeffery
www.ocean.com 192.168.9.110 /nginx/ocean
www.blue.com 192.168.10.120 /nginx/blue
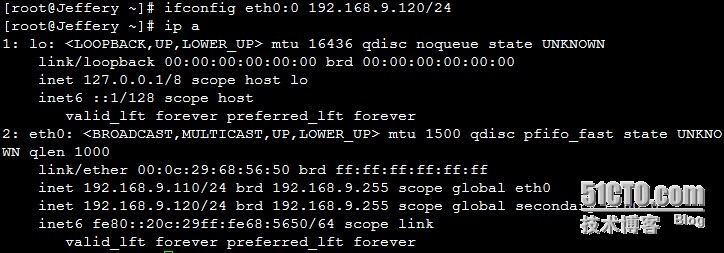
由于使用了两个IP,在接口上绑定IP

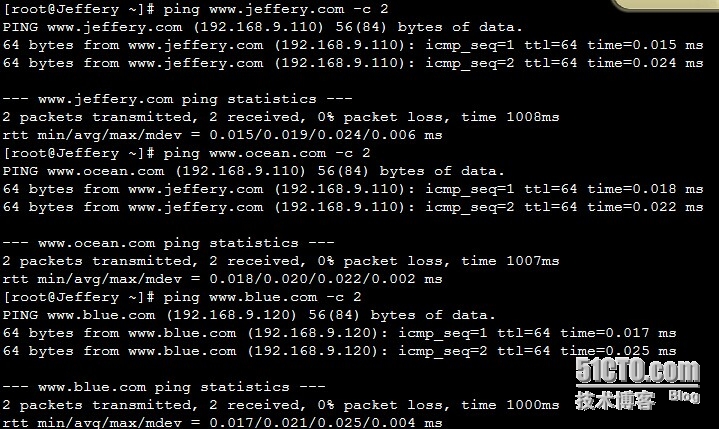
二、DNS解析
这里可以直接写入到 hosts 文件
www.jeffery.com jeffery.com ==> 192.168.9.110
www.ocean.com ocean.com ==> 192.168.9.110
www.blue.com blue.com ==> 192.168.9.120

三、Nginx虚拟主机
1. 准备工作

2.配置Nginx实现虚拟主机
[root@jeffery ~]# vim /usr/local/nginx/conf/nginx.conf
#工作模式及连接数上限
worker_processes 1; #cpu核心数
events {
worker_connections 1024; #连接数
}
#设定http服务器,利用它的反向代理功能提供负载均衡支持
http {
include mime.types;
default_type application/octet-stream;
sendfile on;
keepalive_timeout 65;
server {
listen 192.168.9.110:80;
server_name www.jeffery.com jeffery.com; #基于主机名
location / {
root html/jeffery;
index index.html index.htm;
}
error_page 500 502 503 504 /50x.html;
location = /50x.html {
root html;
}
}
server {
listen 192.168.9.110:80;
server_name www.ocean.com ocean.com; #基于主机名
location / {
root html/ocean;
index index.html index.htm;
}
error_page 500 502 503 504 /50x.html;
location = /50x.html {
root html;
}
}
server {
listen 192.168.9.120:80;
server_name www.blue.com blue.com; #基于主机名
location / {
root html/blue;
index index.html index.htm;
}
error_page 500 502 503 504 /50x.html;
location = /50x.html {
root html;
}
}
}
3. 检测配置文件并重新启动
[root@jeffery ~]# /usr/local/nginx/sbin/nginx -t
nginx: the configuration file /usr/local/nginx/conf/nginx.conf syntax is ok
nginx: configuration file /usr/local/nginx/conf/nginx.conf test is successful
[root@Jeffery ~]# pgrep nginx
5856
5857
[root@Jeffery ~]# kill -HUP 5856
[root@Jeffery ~]# /usr/local/nginx/sbin/nginx -s reload
4.测试
有

无
